NetStores E-Commerce Extensions
Quick Search
Overview
To allow users to quickly search the products in your online store, you can use the Quick-Search interface.
Before you use this...
Before you start using the Quick-Search
feature, if you have not already done this, select the NetStores
panel from the Dreamweaver Objects panel by selecting NetStores from the
drop-down menu.
 
For the Quick-Search feature to work, you must first perform Steps 1-7 (start at Step 1 - Setup).
Adding the Quick-Search interface to a page (top)
To add a Quick-Search button to your Web
page, simply position the cursor where you want the button and click the
Quick-Search icon  in
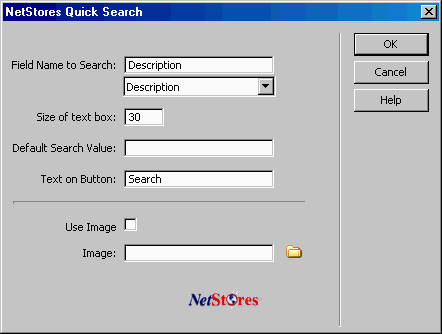
the NetStores objects panel. The following dialog box appears: in
the NetStores objects panel. The following dialog box appears:

Quick-Search details (top)
Select the Field name to Search (Name, Description, or Category) from the pull-down menu. If you have configured your store to search other fields, you may type in a matching field name. These search-field names are the same names that show up in the results of a general Search.
The Size of text box is a numeral that indicates how much room, in characters to allow for customers to enter their search parameters. The number 30 results in the text box pictured below.
The Default Search Value is the text that will appear in the text entry box in the Quick-Search dialog box. This is the word or phrase that search seeks if the customer does not change it. In the example pictured above, the word Demo was used for the default search value.
The picture below shows the resulting search, using the default item file.
Customizing the appearance of the Quick-Search button (top)
You can change the visible features of the Quick-Search button by selecting your own text or image for the button. To make these modifications, insert entries in the NetStores Quick-Search dialog box (see picture below) as follows:
Text on Button entry: Changing this entry changes the text on the Quick-Search input button on your Web page, if you are not using an image to replace the button.
Use Image check box: Clicking the check box changes Quick-Search on your Web page from a simple button to an image that you provide. You must also enter a file name in the Image text box.
Image entry: Enter the name of an image to use as the Quick-Search button. You can browse for the file name using the Browse button. For the image to be used, you must also click the Use Image check box.
The last settings you used to create a Quick-Search link will be saved for the next time you use the Quick-Search object.
For additional information, go to the online Dreamweaver extensions page at http://Dreamweaver.netstores.com/.
Getting Started / Installing / Setup / Item File / Configure Store / Connect Item File /
Objects: / Add to Cart / View Cart / Search / Quick Search / Driven Search / Quick Form
Copyright © 2002, Fishbone Communications,
Inc. - NetStores ®
|


