NetStores
E-Commerce Extensions
Add to Cart
Overview
The NetStores E-Commerce system uses a shopping cart that allows your customers to add to, modify, and view the list of products they will purchase from your online Web store. The primary method for adding items to a customer's shopping cart is the NetStores Add-to-Cart or instant-purchase button.
Before you use
this...
Before you start using the Add-to-Cart
feature, if you have not already done this, select the NetStores
objects from the Dreamweaver Objects panel by clicking the down arrow
and selecting NetStores.
  . .
For the Add-to-Cart button to work, you must first perform Steps 1-7 (start at Step 1 - Setup).
Adding the Shopping Cart button to a page (top)
To insert an instant-purchase button,
position the cursor next to a product in your Web page where you want
the button and click the Add-to-Cart icon  in the NetStores objects panel.
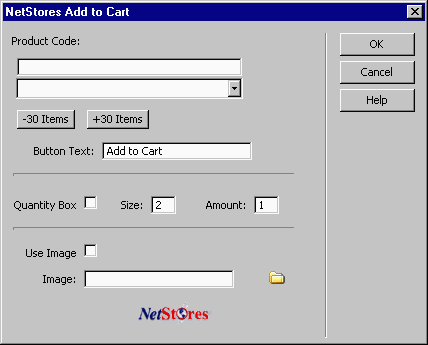
The NetStores Add-to-Cart dialog box (see picture below) allows you to configure the Add-to-Cart button so a particular product or service will be added to the customer's shopping cart. The dialog box also allows you to customize the Add-to-Cart button to suit your aesthetic preferences to match the "look and feel" of your Web site.

Shopping cart button details (top)
The most important aspect of the NetStores Add-to-Cart dialog box is the Product Code entry area. For your Add-to-Cart button actually to be able to add products to the customer's shopping cart, you must input the product code of an item from your inventory in the item file. You can do this in one of two ways. You can type in the product code (or item number, or SKU) in the text entry area at the top of the dialog box. Alternatively, if you have properly Configured
your store, you can select the appropriate product code from the Product Code pull-down menu.
The Product Code pull-down menu shows up to 30 items from your item
file. Since it is not unusual to have more than 30 items in an inventory, you can move through your inventory (item file) using the "-30
items" and "+30 items" buttons. To list the 31st through 60th product codes, you press the "+30 items"
button, and to go back to the 1st through 30th product codes you press
the "-30 items".
Customizing the appearance of the Add-to-Cart button (top)
You can also change the appearance of the Add-to-Cart button by selecting your own text or image for the button. To make these modifications, insert entries in the NetStores Add-to-Cart dialog box (see picture above) as follows:
Button text entry: Changing this entry changes the text on the Add-to-Cart input button on your Web page, if you are not using an image to replace the button.
Use Image check box: Clicking the check box changes the Add-to-Cart link on your Web page from a simple input button to an image that you provide. You must also enter a file name in the Image text box.
Image entry: Enter the name of an image to use as the Add-to-Cart link. You can browse for the file name using the Browse button. For the image to be used, you must also click the Use Image check box.
The settings you used when you last created an Add-to-Cart button (by clicking OK), are saved and will reappear the next time you use the Add-to-Cart object.
|


